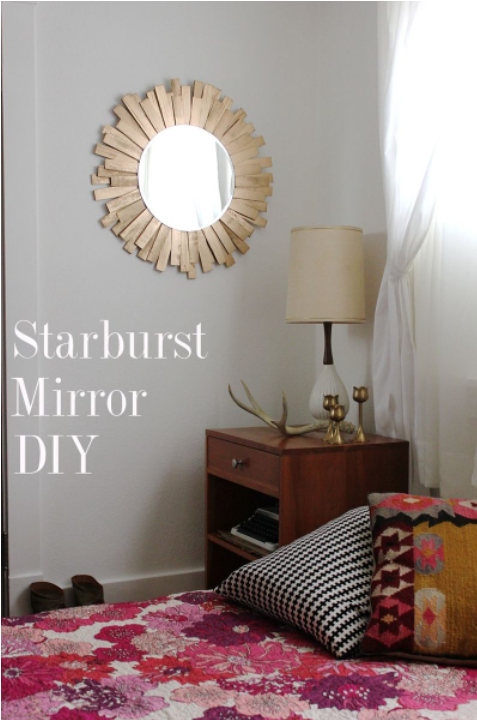
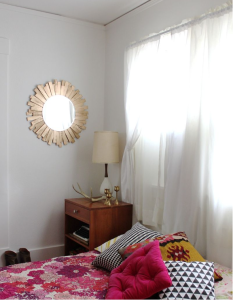
Starburst Mirror DIY Bedroom, Home Decor with Original Gorilla Glue

I wanted to create something for our bedroom that replaced an old art piece that wasn’t really working and that also added more light to a dark corner in that space. I kind of held my breath while I was working on this, because I honestly wasn’t sure if it was going to look really handmade or not. I was thrilled with the end result once I had it hung. It’s just become of of my favorite finished projects!
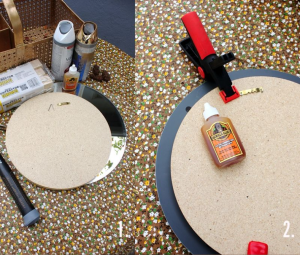
Supplies:
-1 pack of contractor shims,
-12″ diameter circular cut of wood
-14″ circular mirror
– Original Gorilla Glue, hot glue gun and glue (not shown)
– Two clamps or heavy books
– Hook for back of mirror
– Primer and spray paint in your choice (I used a standard primer, and I recommend Valspar’s Metallic paint for a great top coat)
– Painter’s tape and paper to cover the mirror when you spray
– Cardboard to keep your workspace safe
– Hammer for attaching hook to wood
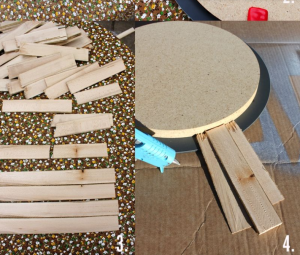
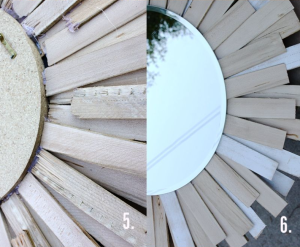
First, hammer your hook to the back of your wood about 1″ below the edge. Then generously spread Original Gorilla Glue around the opposite side of your wood and center it on the back of your mirror. You should have about 1″ overhang from your mirror. Split your shims. I just stepped down on the small part so that the outer edge of my foot was centered on the shim and pulled up. The shims usually split in the same natural spot giving me one shorter and one longer piece. Some pieces were a clean snap, and others were a bit splintered. Trim the splinters down with scissors or by scraping them on the ground. Sort into two piles—one short and one long. If you get medium sized pieces, make a pile for them. This will help when you’re gluing them on.
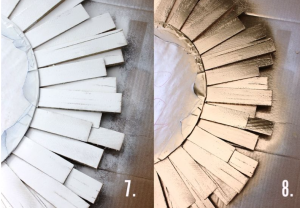
Start applying Original Gorilla Glue to the shims down to the back of the mirror with the splintered pieces facing in, so they won’t show. I suggest using Original Gorilla Glue on your shorter pieces first almost spaced evenly around the mirror and then adding longer sizes on top of them. This will look best when you have it hanging. Fill in the gaps so that there are 2-3 pieces layered as shown above. Your back side will look like this when you’re finished. Kind of messy but it won’t be seen. Make sure your shims don’t reach higher than 3 layers or they’ll cause the mirror to be lopsided when it hangs, as it won’t sit flush with the wood backing. You can extend shorter pieces out so long as there isn’t a hole where the splintered end will show through from the front.
If you’d like more of a beach vibe, paint about 1/4 or 1/3 of the shims white or some other color before using Original Gorilla Glue to glue them down and spread them out. Tape some paper down on top of your mirror and carefully cover the edges with painter’s tape. Don’t cover your shims or they’ll have bare spots when you spray paint. Go for an all white vibe with primer and a layer of white for a crisp look or add a metallic for something warmer. I love the way the Valspar metallic ended up, because it’s so thick and really pigmented to shine. Remove your tape after it’s completely dried and hang carefully.
NOTE: Use caution when flipping or hanging your mirror as the shims may be easily knocked off if not secured well.
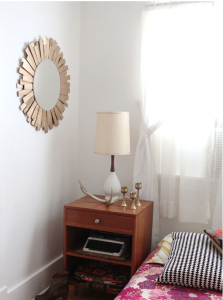
It ended up being about 26″ in diameter which makes it plenty substantial to hang on a wall by itself without feeling like it’s floating. It would look lovely over a mantle or above an end table in your living room. Try it without splitting your shims to get an even larger finished piece. It’s another inexpensive way to brighten your home on a budget!
Ain’t it beautiful !!! Come on now is your time to shine, don’t hesitate to sent us your project using Original Gorilla Glue.